How to authenticate to AWS with IAM Identity Center

For many years, the main way to authenticate to AWS was to use Identity and Access Management (IAM), but in the last few years, AWS has been pushing users towards the newer IAM Identity Center (formerly known as AWS SSO), which offers a more secure and convenient way to authenticate. This blog post is a guide to how to set up IAM Identity Center and use it to authenticate to AWS, both on the web and the command line. Here’s an outline of what this post will cover:
- Prerequisite: create an AWS account
- Enable IAM Identity Center
- Create permission sets
- Create groups
- Create or sync users
- Authenticate to AWS on the web
- Authenticate to AWS on the command line
Let’s get started by taking care of a prerequisite: creating an AWS account.
Prerequisite: create an AWS account
This is a guide to authenticating to AWS, so of course you need an AWS account! If you don’t already have one, do the following:
- Sign up. Head over to https://aws.amazon.com and follow the on-screen instructions to sign up. You’ll have to provide a credit card for payment, but AWS offers a free tier, which includes the IAM Identity Center, so following this guide shouldn’t cost you anything.
- Protect the root user credentials. When you first register for AWS, you initially sign in as the root user. It’s critical to protect the root user account, so make sure to store the root user credentials in a secure password manager (e.g., 1Password, BitWarden). You’ll learn more about secrets management in Chapter 8 of Fundamentals of DevOps and Software Delivery.
- Enable MFA for the root user. As an additional layer of protection, make sure to enable multi-factor authentication (MFA) for the root user.
The root user, by design, has permissions to do absolutely anything in your AWS account, including bypassing most security restrictions you put in place, so from a security perspective, it’s not a good idea to use the root user on a day-to-day basis. In fact, the only thing you should use the root user for is to create other user accounts in the IAM Identity Center with more-limited permissions, as described in the following steps.
Enable IAM Identity Center
By default, when you create a new AWS account, IAM Identity Center is not enabled. To enable it, head over to the IAM Identity Service Console, and if you see an Enable IAM Identity Center button, as shown in the image below, click it:
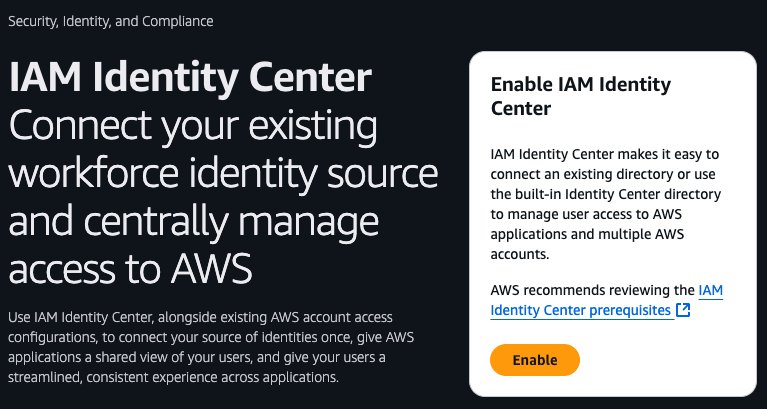
On the next screen, select Enable with AWS Organizations, click Continue, and wait a minute or two for IAM Identity Center to be available. Once the IAM Identity Center dashboard loads, on the right side, you should see the settings summary, as shown in the following image:
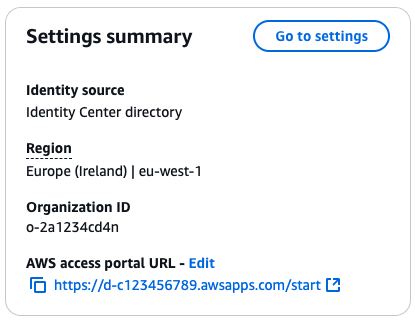
Take note of the following two pieces of information:
- Region: Jot down which AWS region you’re using for AWS Identity Center. It’ll be something like “United “Europe (Ireland) | eu-west-1” or “States (Ohio) | us-east-2”. You can learn more about AWS regions here.
- Access portal URL: Jot down your unique AWS access portal URL. It’ll look something like
https://d-c123456789.awsapps.com/start/. A little later on, you’ll see how to use this URL to log in to your AWS accounts.
Write both of these down, as you’ll need them later to login.
Create permission sets
By default, new IAM Identity Center users have no permissions whatsoever and cannot do anything in an AWS account. To give a user the ability to do something, you need to associate one or more permission sets with that user. A permission set grants permissions by combining one or more IAM Policies, which are JSON documents that define what you are or aren’t allowed to do. You can create your own IAM Policies or use some of the predefined IAM Policies built into your AWS account, which are known as Managed Policies.
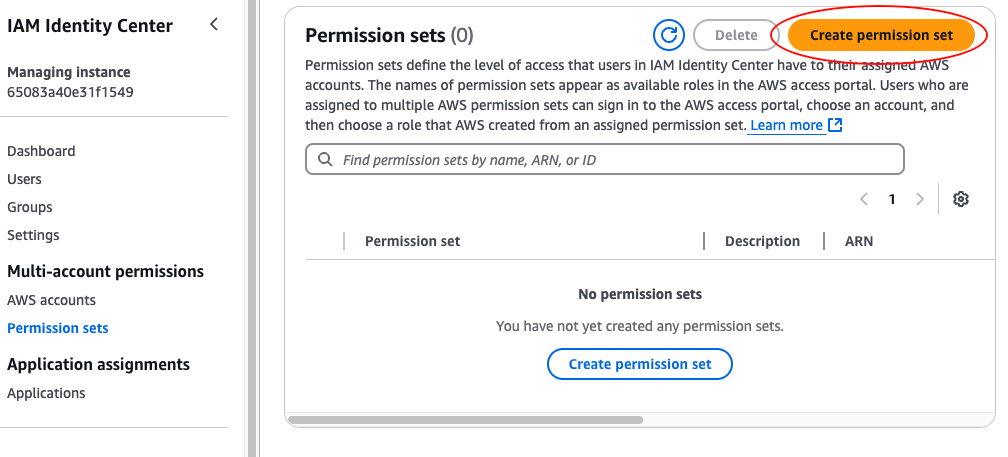
To create a permission set, head over to the IAM Identity Center Console, select “Permission sets” in the left nav, and click the “Create permission set” button, as shown in the following image:
On the next page, you need to pick a permission set type:
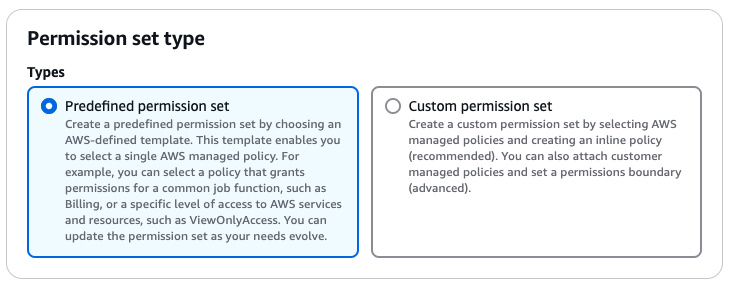
You can either use one of the predefined permission sets (which wrap various AWS managed policies) or create a custom permission set. For the purposes of this tutorial, choose “Predefined permission set,” and you should see the list of available options, as shown in the following image:
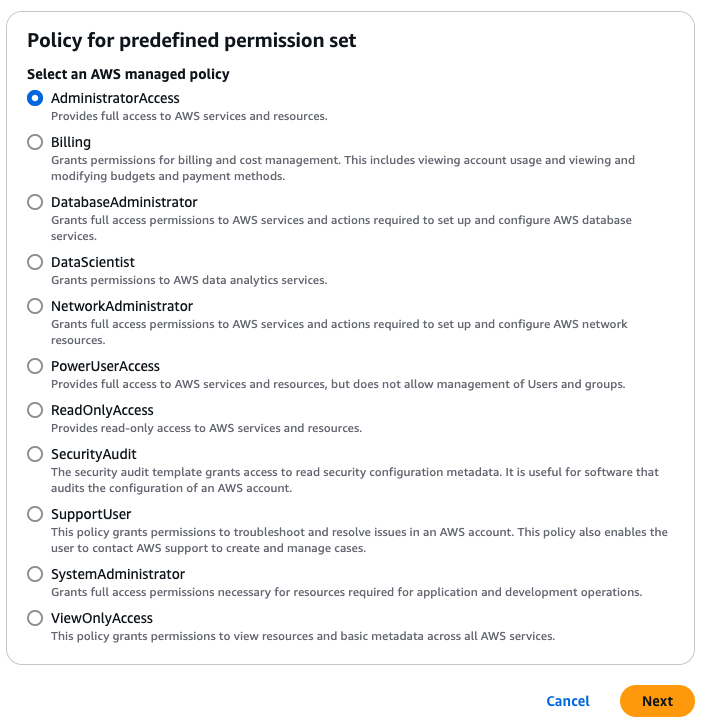
For the purposes of this tutorial, select AdministratorAccess, as at least a few of your users will likely need
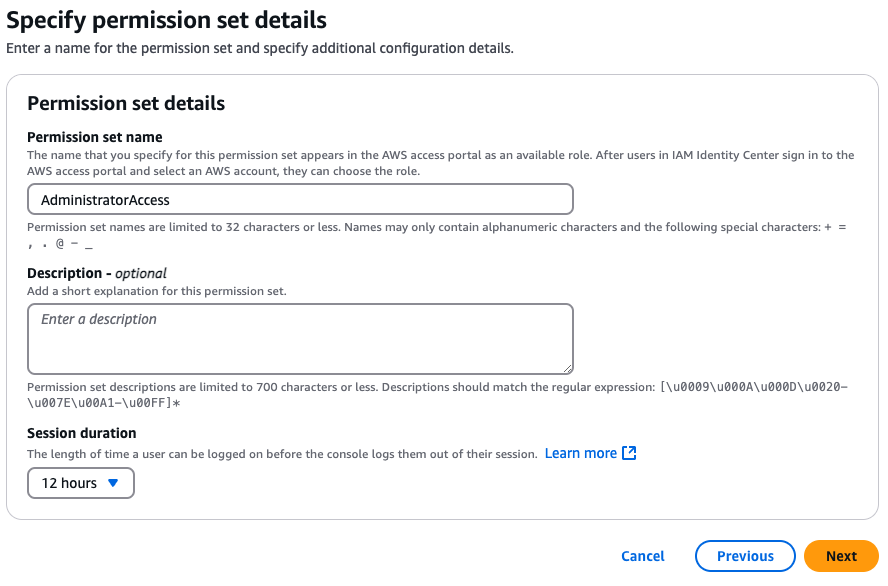
admin permissions (full access to all AWS services and resources), and click the Next button. On the next page,
give the permission set a name—I usually stick with the default, which is the name of the policy (e.g.,
AdministratorAccess), set the session duration to 12 hours (so you aren’t logged out more than once per day), and
click Next:
Review all the settings on the next page, and if everything looks good, click the Create button.
Create groups
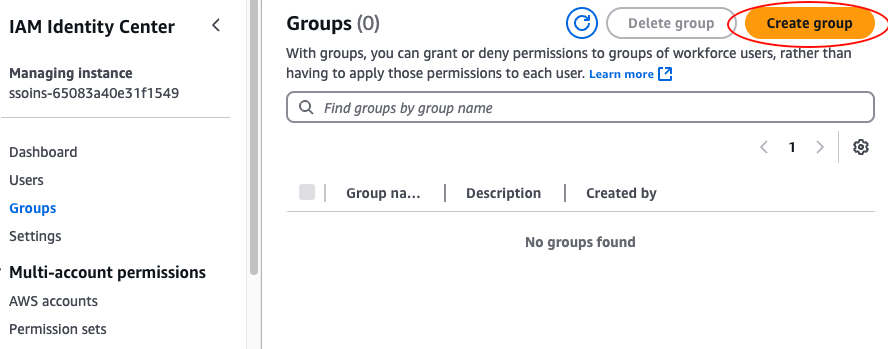
Although you can assign permissions sets directly to users, it’s usually more manageable to assign permissions to groups of users. To create a group, head over to the IAM Identity Center Console, select Groups in the left nav, and click the “Create group” button, as shown in the following image:
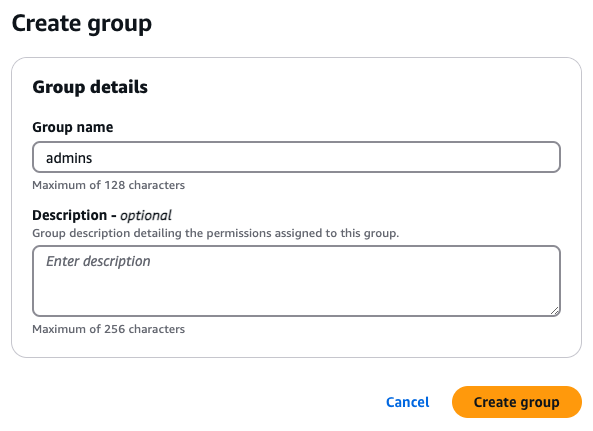
On the next page, you need to configure the group details, such as the group name and description. For the purposes of
this tutorial, give the group the name admins, as shown in the following image, as you’ll be assigning this group
the AdministratorAccess permission set you created earlier:
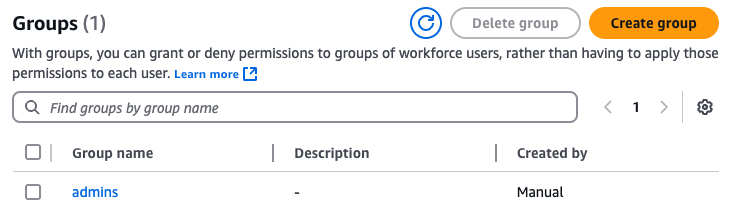
For now, skip adding any users to the group, and click the “Create group” button. This will take you back to the groups
page, where you should see your newly-created admins group, as shown below:
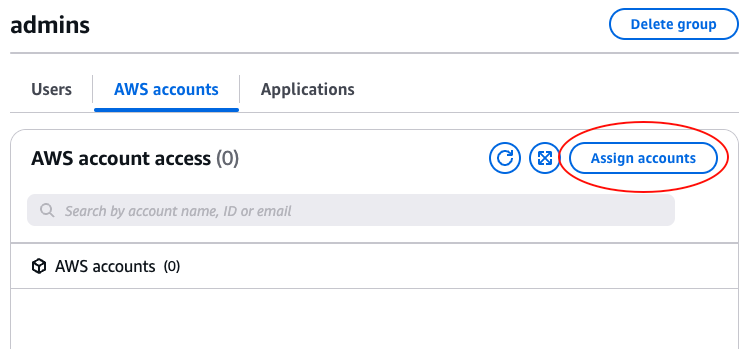
Click on your newly-created admins group, select the “AWS accounts” tab, and click the “Assign accounts” button, as
shown in the following image:
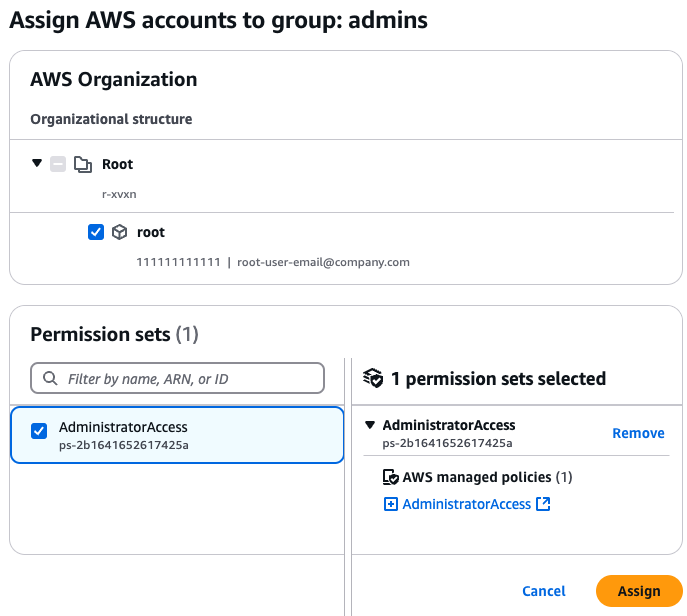
On the next page, grant admin access to one or more AWS accounts by selecting those AWS accounts (e.g., such as the
one you may have created in the pre-requisites section), and then selecting the AdministratorAccess permission set,
as shown in the following image:
Click the Assign button, and wait a minute or so for that process to complete.
Create or sync users
Now that IAM Identity Center is configured, you can finally use it to create more limited user accounts. IAM Identity Center supports two types of identity sources for users:
- Existing (external) identity provider. One option is to sync users from an existing identity provider, such as Active Directory, Google Workspace, or Okta.
- IAM Identity Center Directory. Another option is to use IAM Identity Center itself as your identity provider, creating users directly in its built-in directory.
For most companies, using an existing identity provider is the best option, as that way, you get Single Sign-On (SSO), where you can authenticate to AWS using the same login you use for everything else at work, so there are no extra user accounts or credentials to manage, and when someone leaves the company and is removed from your identity provider (e.g., removed from Active Directory), they automatically lose access to AWS, too. To set up an existing identity provider as an identity source, follow the corresponding tutorial for your identity provider to set up user syncing, and then use the groups page to add users to the appropriate groups.
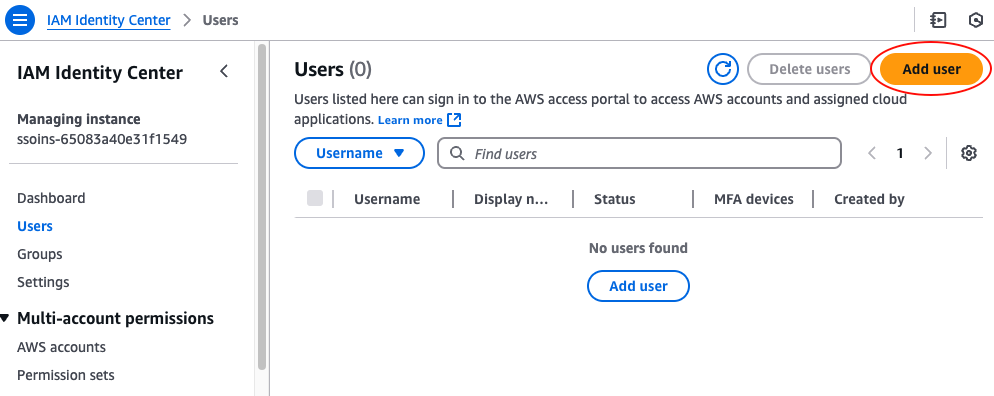
Alternatively, if you’re just using this AWS account for personal learning and testing, you can create a custom user in the directory built into IAM Identity Center itself. For the purposes of this tutorial, let’s try that out. Head over to the IAM Identity Center Console one more time, select Users in the left nav, and click the Add User button, as shown in the following image:
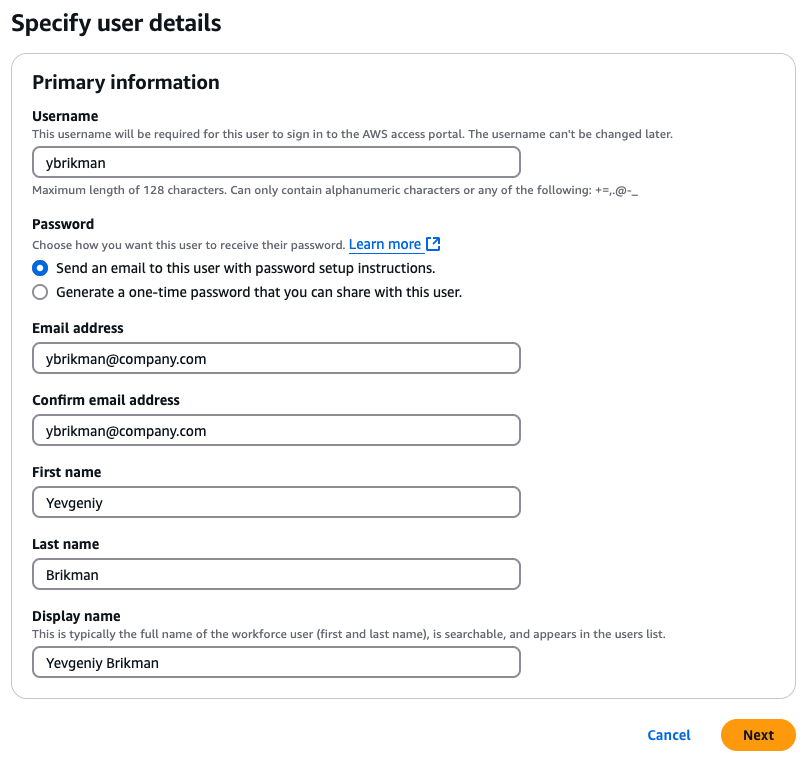
On the next page, enter a username, email address, first name, and last name, leave all other settings at their default, as shown below, and click the Next button:
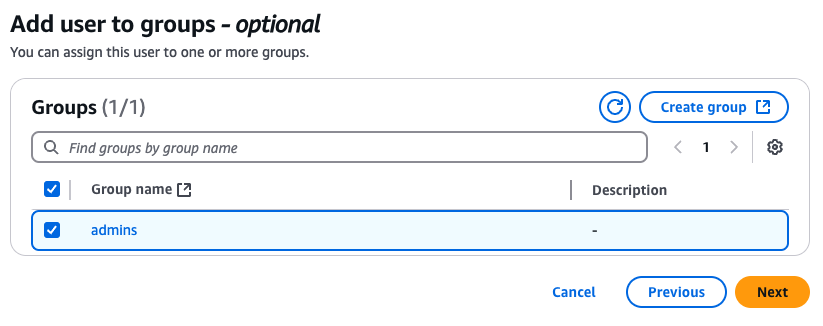
On the next page, add the user to the appropriate groups, such as the admins group, as shown below, and click Next:
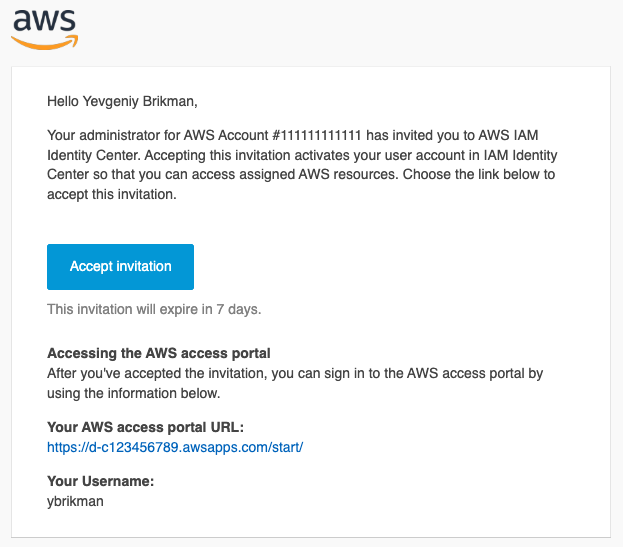
Review the settings on the next page, and if everything looks good, click the “Add user” button. After a few seconds, you should get an invitation email to sign-in via your access portal, as shown in the followin gimage:
Click the “Accept invitation” button in the email, and follow the on-screen instructions to set a password for your user (make sure to save the password in a secure password manager, such as 1Password or BitWarden), login, and configure an MFA device. When you’re done with that process, you should be logged into the access portal, as shown in the following image:
From now on, you can use your IAM Identity Center user (rather than the root user) and this access portal to log in to your AWS accounts. The following two sections describe how to do that.
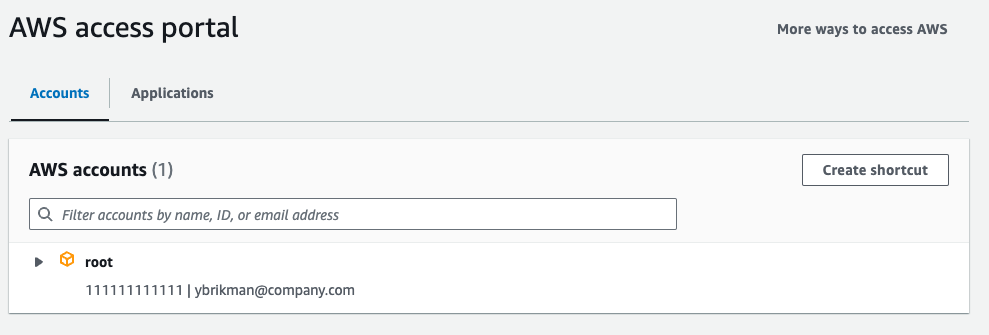
Authenticate to AWS on the web
To access your AWS accounts on the web, first, login to your access portal: you should have the URL saved from when
you configured IAM Identity Center; alternatively, you can find that URL at the bottom of the invite email from when
you created your IAM Identity Center user. Once you’re logged in, the access portal should show you the list of AWS
accounts you have access to. Click the arrow next to one of the accounts, and you should see a link with the name of
the permission set you have access to, such as AdministratorAccess, as shown in the following image:
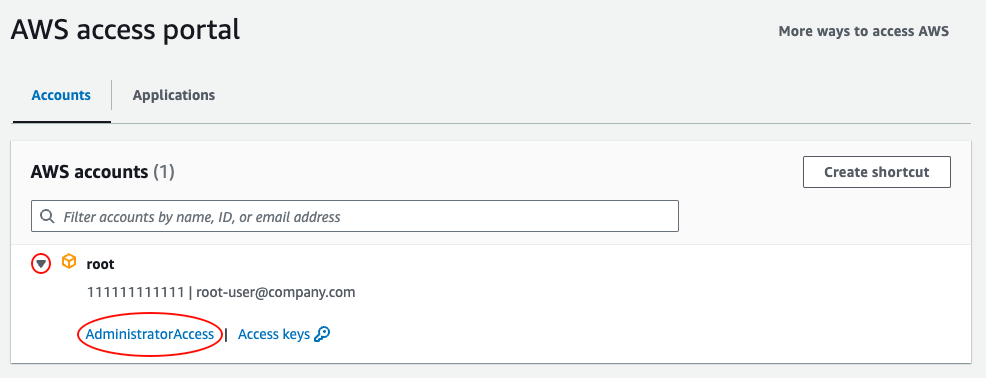
Click on the permission set you want to use (e.g., AdministratorAccess), and AWS will open up a new tab and log you
into that AWS account, with those corresponding permissions. That’s all there is too it!
Authenticate to AWS on the command line
There are multiple ways to authenticate to AWS from the command line. For me, the option that strikes the best balance between convenience (as it lets me use my browser for authentication) and security (as it only uses temporary credentials) is to use the AWS Command Line Interface (CLI) along with IAM Identity Center. To use this method, install the AWS CLI (make sure to install version 2.15 or newer), and configure a session and profile, as described in the next two sections.
Configure a session
A session in the AWS CLI roughly corresponds to being authenticated to a single IAM Identity Center access portal
(which usually corresponds to a single AWS organization). To configure a session, run the aws configure sso command:
$ aws configure sso
SSO session name (Recommended): personal
SSO start URL [None]: https://d-c123456789.awsapps.com/start/
SSO region [None]: eu-west-1
SSO registration scopes [sso:account:access]:
The AWS CLI will prompt you for the following information:
- SSO session name. This typically corresponds to the AWS organization where you have AWS Identity Center and an access portal configured. For example, if this is your personal AWS account, you might name it “personal.” If this is an AWS organization you use at work, and you only have one such organization, you might name it after your company. If your company has multiple AWS organizations, you might name it after the corresponding organization name.
- SSO start URL. This is the URL of the access portal you use to log in to your AWS accounts. This is one of the
pieces of information you saved when configuring IAM Identity Center; it’s also in the invitation email you got when
creating an IAM Identity Center user. It looks something like
https://d-c123456789.awsapps.com/start/. - SSO region name. This is the AWS region in which you set up AWS IAM Identity Center (e.g., eu-west-1).
- SSO registration scopes. These scopes define the permissions the AWS CLI will have on your behalf. You can find
the available scopes
here, but in most
cases, you can hit Enter to leave this value at its default (
sso:account:access).
Once you’ve filled in all this information, the AWS CLI will open your browser window, which allows you to log in to your access portal as usual (in fact, you may still be logged in from earlier, which saves you from having to retype your credentials). Follow the on-screen prompts to authorize the AWS CLI, clicking “Confirm and continue” (if the code matches what you see in your terminal) and then “Allow access,” as shown in the following image:
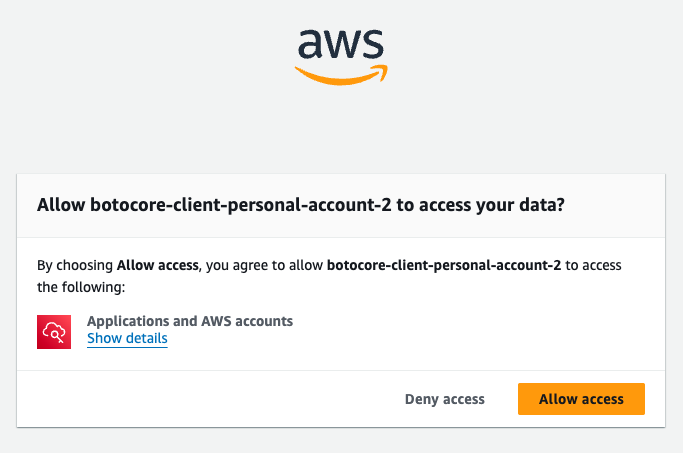
Once you’ve approved the request, you can close the browser window, and go back into the terminal to configure a profile, as described in the next section.
Configure a profile
A profile in the AWS CLI corresponds to being logged into a single AWS account (one of the ones within the AWS organization that’s part of the session) with a specific permission set. After you’ve configured a session and gone back to the terminal, the AWS CLI will start configuring a profile. If your IAM Identity Center user has access to only a single AWS account and permission set, the AWS CLI will use that one automatically for the profile, but if you have access to multiple AWS accounts, the AWS CLI will show you a drop-down where you can pick which account to authenticate to, as shown below, and if you have access to multiple permission sets in that account, you’ll get another drop-down to pick which permission set to use:

Once you’ve picked an account and permission set, the AWS CLI will then prompt you for the following information:
CLI default client Region [None]:
CLI default output format [None]: text
CLI profile name [AdministratorAccess-111111111111]: personal-mgmt-admin
Here is the information the CLI prompts you for:
- CLI default client Region. The default AWS region to use for all API calls to AWS. I typically hit Enter to leave this value at its default, None, which helps me avoid accidentally using the wrong region, as it forces me to explicitly specify the region in all my API calls.
- CLI default output format. The default output format to use with the AWS CLI. The supported
options include
text,json, andtable. - CLI profile name. This is the name to use for the profile. Since this corresponds to a single permission set in
a single account in a single AWS organization, you may want to use a name format such as
<ORG>-<ACCOUNT>-<PERMISSIONS>, whereORGis the name of the organization,ACCOUNTis the name of the account, andPERMISSIONSrepresents the permissions you’ll have in that account. For example, you might name the profilepersonal-mgmt-adminto indicate that this profile gives you admin permissions in the management account of your personal AWS organization.
Once you enter all this information, your session and profile will be created, and you’ll be logged into that session. You can now use this session and profile with all your AWS CLI tools, as described in the next section.
Use sessions and profiles with CLI tools
Now that you’re authenticated, you can use your pfoile with the AWS CLI and any other CLI tools that need to
authenticate to AWS by passing in the profile name via the --profile flag. For example, you can check your
authentication with the AWS CLI as follows:
$ aws sts get-caller-identity --profile=personal-mgmt-admin
Alternatively, as not all tools support the --profile flag, you can set the AWS_PROFILE environment variable:
$ export AWS_PROFILE=personal-mgmt-admin
Now the AWS CLI will automatically use that profile without additional flags:
$ aws sts get-caller-identity
Moreover, any CLI tool that authenticates to AWS, such as OpenTofu, will automatically use that profile, too:
$ tofu apply
Re-authenticate
If your session expires (e.g., after 12 hours), you can log in again using the aws sso login command:
$ aws sso login --sso-session personal
Note that logging into a session allows you to use all the profiles that are part of that session without having to
log in again. So if you had the profiles personal-mgmt-admin, personal-dev-admin, and personal-prod-admin, all
under the personal session, then as soon as you log in to the personal session, you can use all three of those
profiles (via the --profile flag or AWS_PROFILE environment variable) without having to log in again.
Add more profiles
If you need to add other profiles in the future (to access other accounts or permissions sets), you can run the
aws configure sso command again, and enter the session name you used previously:
$ aws configure sso
SSO session name (Recommended): personal
As soon as you start typing, you’ll get an auto-complete drop down that shows you all existing session names,
so you can pick one, and hit Enter. This will skip all the other session configuration and go straight to the profile
configuration. Alternatively, you can add profiles by hand to your AWS CLI configuration
file, which lives in
~/.aws/config on Linux or macOS, or at C:\Users\USERNAME\.aws\config on Windows.
Conclusion
You now know the basics of setting up IAM Identity Center and using it to authenticate to your AWS accounts, both in the web browser and on the command line. To go further, here are a few exercises you can try at home to get your hands dirty:
- Create custom permission sets so you can grant users least-privilege access to your accounts.
- Set up SSO with your existing identity provider, such as Active Directory, Google Workspace, Okta, JumpCloud, OneLogin, or Ping.
- Secure IAM Identity Center by setting up logging and compliance validation.
To learn how to integrate authentication and SSO into your software delivery process, check out Fundamentals of DevOps and Software Delivery!