Learn Git and GitHub in 15 Minutes


A version control system (VCS) is a tool that allows you to store source code, share it with your team, integrate your work together, and track changes over time. A VCS is a central part of every modern software delivery process, and yet, I still frequently come across developers who don’t know how or why to use version control. If you’re one of these developers, it’s nothing to be ashamed of, and you’ll find that if you take a small amount of time to learn it now, it’s one of those skills that will benefit you for years to come. This tutorial will teach you the basics of how to use two of the most popular version control tools available today, Git and GitHub, through a series of hands-on exercises that take about 15 minutes.
Here’s what this tutorial will cover:
- Version control primer: Learn the basics of what a VCS is and why you might use one.
- Git crash course: Learn the basics of using Git on your own computer.
- GitHub crash course: Learn the basics of using Git with others by using GitHub.
Let’s get started by learning the basics of version control.
Version control primer
Have you ever written an essay in Microsoft Word? Maybe you start with a file called essay.doc, but then you realize you need to do some pretty major changes, so you create essay-v2.doc; then you decide to remove some big pieces, but you don’t want to lose them, so you put those in essay-backup.doc, and move the remaining work to essay-v3.doc; maybe you work on the essay with your friend Anna, so you email her a copy, and she starts making edits; at some point, she emails you back the doc with her updates, which you then manually combine with the work you’ve been doing, and save that under the new name essay-v4-anna-edit.doc; you keep emailing back and forth, and you keep renaming the file, until minutes before the deadline, you finally submit a file called something like essay-final-no-really-definitely-final-revision3-v58.doc.
Believe it or not, what you’re doing is essentially version control. You could represent it with the following diagram:
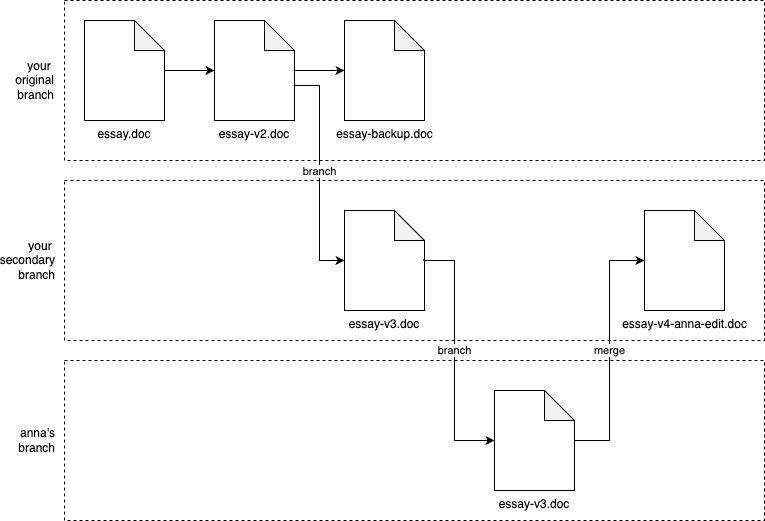
You start with essay.doc, and after some major edits, you commit your changes to a new revision called essay-v2.doc. Then, you realize that you need to break off in a new direction, so you could say that you’ve created a new branch from you original work, and in that new branch, you commit another new revision called essay-v3.doc. When you email Anna essay-v3.doc, and she starts her work, you could say that she’s working in yet another branch. When she emails you back, you manually merge the work in your branch and her branch together to create essay-v4-anna-edit.doc.
What you’ve just seen is the essence of version control: commits, branches, and merges. Admittedly, manually emailing and renaming Word docs isn’t a very good version control system, but it is version control!
A better solution would be to use a first-class VCS, which can perform these operations more effectively. The basic idea with a VCS is as follows:
- Repositories: You store files (code, documents, images, etc.) in a repository (repo for short).
- Branches: You start with everything in a single branch, often called something like
main. At any time, you can create a new branch from any existing branch, and work in your own branch independently. - Commits: Within any branch, you can edit files, and when you’re ready to store your progress in a new revision, you create a commit with your updates. The commit typically records not only the changes to the files, but also who made the changes, and a commit message that describes the changes.
- Merges: At any time, you can merge branches together. For example, it’s common to create a branch from
main, work in that branch for a while, and then merge your changes back intomain. - Conflicts: VCS tools can merge some types of changes automatically, but if there is a conflict (e.g., two people changed the same line of code in different ways), the VCS will ask you to resolve the conflict manually.
- History: The VCS tracks every commit in every branch in a commit log, which lets you see the full history of how the code changed, including all previous revisions of every file, what changed between each revision, and who made each change.
Learning about all these terms and concepts is useful, but really, the best way to understand version control is to try it out, as in the next section.
A Crash Course on Git
There have been many version control systems developed over the years, including CVS, Subversion, Perforce, and Mercurial, but these days, the most popular, by far, is Git. According to the 2022 StackOverflow Developer Survey, 93% of developers use Git (96% if you look solely at professional developers). So if you’re going to learn one VCS, it should be Git.
Git basics
If you don’t have it already installed, follow these docs to install Git on your computer. Next, let Git know your name and email:
$ git config --global user.name "<YOUR NAME>"
$ git config --global user.email "<YOUR EMAIL>"
Create a new, empty folder on your computer just for experimenting with Git. For example, you could create a folder called git-practice within the system temp folder:
$ mkdir /tmp/git-practice
$ cd git-practice
Within the git-practice folder, write some text to a file called example.txt:
$ echo 'Hello, World!' > example.txt
It would be nice to have some version control for this file. With Git, that’s easy. You can turn any folder into a Git
repo by running git init:
$ git init
Initialized empty Git repository in /tmp/git-practice/.git/
The contents of your folder should now look something like this:
$ tree -aL 1
.
├── .git
└── example.txt
You should see your original example.txt file, plus a new .git folder. This .git folder is where Git will record all the information about your branches, commits, revisions, and so on.
At any time, you can run the git status command to see the status of your repo:
$ git status
On branch main

No commits yet

Untracked files:
  (use "git add <file>..." to include in what will be committed)
	example.txt
The status command is something you’ll run often, as it gives you several useful pieces of information: what branch
you’re on (main is the default branch when you create a new Git repo); any commits you’ve made; and any changes
that haven’t been committed yet. To commit your changes, you first need to add the file(s) you want to commit to the
staging area using git add:
$ git add example.txt
Try running git status one more time:
$ git status
On branch main

No commits yet

Changes to be committed:
  (use "git rm --cached <file>..." to unstage)
	new file:   example.txt
Now you can see that example.txt is in the staging area, ready to be committed. To commit the changes, use the
git commit command, passing in a description of the commit via the -m flag:
$ git commit -m "Initial commit"
Git is now storing example.txt in its commit log. You can see this by running git log:
$ git log
commit 7a536b3367981b5c86f22a27c94557412f3d915a (HEAD -> main)
Author: Yevgeniy Brikman
Date:   Sat Apr 20 16:01:28 2024 -0400

    Initial commit
For each commit in the log, you’ll see the commit ID, author, date, and commit message. Take special note of the
commit ID: each commit has a different ID that you can use to uniquely identify that commit, and many Git commands
take a commit ID as an argument. Under the hood, a commit ID is calculated by taking the SHA-1 hash of the contents of
the commit, all the commit metadata (author, date, and so on), and the ID of the previous commit. Commit IDs are 40
characters long, but most git commands allow you to specify just the first few characters, so long as the substring
is unique to one commit. That means you can sometimes use as few as the first 4 characters, though its more common to
use the first 7 characters, as that’s usually enough to uniquely identify commits in all but the largest repos.
Let’s make another commit. First, make a change to example.txt:
$ echo 'New line of text' >> example.txt
This adds a second line of text to example.txt. Run git status once again:
$ git status
On branch main
Changes not staged for commit:
  (use "git add <file>..." to update what will be committed)
  (use "git restore <file>..." to discard changes in working directory)
	modified:   example.txt
Now Git is telling you that it sees changes locally, but these changes have not been added to the staging area. To see
what these changes are, run git diff:
$ git diff
diff --git a/example.txt b/example.txt
index 8ab686e..3cee8ec 100644
--- a/example.txt
+++ b/example.txt
@@ -1 +1,2 @@
 Hello, World!
+New line of text
You should use git diff frequently to check what changes you’ve made before committing them. If the changes look good,
use git add to stage the changes and git commit to commit them:
$ git add example.txt
$ git commit -m "Add another line to example.txt"
Now, try git log again, adding the --oneline flag to get more concise output:
$ git log --oneline
02897ae (HEAD -> main) Add another line to example.txt
0da69c2 Initial commit
Now you can see both of your commits, including their commit messages. This commit log is very powerful:
- Debugging: If something breaks in your code, the first question you typically ask is, “what changed?” The commit log gives you an easy way to answer that question.
- Reverting: Git offers numerous ways to revert changes, such as
git revertandgit reset(learn more about these commands here). - Comparison: While
git diffcompares your local changes to the latest in the current branch, you can also usegit diff <COMMIT_1> <COMMIT_2>to compare any two commits, passing in IDs of those commits as arguments. - Author: You can use
git blameto annotate each line of a file with information about the last commit that modified that file, including the date, the commit message, and the author. Although you could use this to blame someone for causing a bug, as the name implies, the more common use case is to help you understand where any give piece of code came from, and why that change was made.
So far, all of your commits have been on the default branch (main), but in real-world usage, you typically use
multiple branches, which is the focus of the next section.
Git branching and merging
Let’s practice creating and merging Git branches. To create a new branch and switch to it, use the git switch
command with the -c flag:
$ git switch -c testing
Switched to a new branch 'testing'
To see if it worked, you can use git status, as always:
$ git status
On branch testing
nothing to commit, working tree clean
You can also use the git branch command at any time to see what branches are available and which one you’re on:
$  git branch
  main
* testing
Any changes you commit now will go into the testing branch. To try this out, modify example.txt once again:
$ echo 'Third line of text' >> example.txt
Next, stage and commit your changes:
$ git add example.txt
$ git commit -m "Added a 3rd line to example.txt"
If you use git log, you’ll see your three commits:
$ git log --oneline
5b1a597 (HEAD -> testing) Added a 3rd line to example.txt
02897ae (main) Add another line to example.txt
0da69c2 Initial commit
But that third commit is only in the testing branch. This is visible in a subtle way in the git log output
(note how main is only up to the second commit, whereas testing is on the third), but if you want to see it more
clearly, run git switch to switch back to the main branch:
$ git switch main
Switched to branch 'main'
Check the contents of example.txt: it’ll have only two lines. And if you run git log, it’ll have only two commits.
So each branch gives you a copy of all the files in the repo, and you can modify them in that branch, in isolation, as
much as you want, without affecting any other branches.
Of course, working forever in isolation doesn’t usually make sense. You eventually will want to merge your work back
together. One way to do that with Git is to run git merge to merge the contents of the testing branch into the
main branch:
$ git merge testing
Updating c4ff96d..c85c2bf
Fast-forward
 example.txt | 1 +
 1 file changed, 1 insertion(+)
You can see that Git was able to merge all the changes automatically, as there were no conflicts between the main and
testing branches. If you now look at example.txt, it will have three lines in it, and if you run git log, you’ll
see three commits.
Now that you know how to run Git locally, on your own computer, you’ve already learned something useful. If nothing else, you now have a way to store revisions of your work that’s more effective than essay-v2.doc, essay-v3.doc, etc. But to see the full power of Git, you’ll want to use it with other developers, which is the focus of the next section.
A Crash Course on GitHub
Git is a distributed VCS, which means that every team member can have a full copy of the repository, and do commits, merges, and branches, completely locally. However, the most common way to use Git is to pick one copy of the repository as the central repository that will act as your source of truth. This central repo is the one everyone will initially get their code from, and as you make changes, you always push them back to this central repo.
The typical way to run such as a central repo is to use a hosting service. These not only host Git repos for you, but they also provide a number of other useful features, such as web UIs, user management, development workflows, issue tracking, security tools, and so on. The most popular hosting services for Git are GitHub, GitLab, and BitBucket. Of these, GitHub is the most popular by far.
In fact, you could argue that GitHub is what made Git popular. GitHub provided a great experience for hosting repos and collaborating with team members, and it has become the de facto home for most open source projects. So if you wanted to use or participate in open source, you often had to learn to use Git, and before you knew it, Git and GitHub were the dominant players in the market. Therefore, it’s a good idea to learn to use not only Git, but GitHub as well.
Push your code to GitHub
Let’s push the example code you’ve worked on in this tutorial to GitHub. Go into the folder where you have your Git repo:
$ cd /tmp/git-practice
If you don’t have a GitHub account already, sign up for one now (it’s free), and follow the authenticating on the command line documentation to learn to authenticate to GitHub from your terminal.
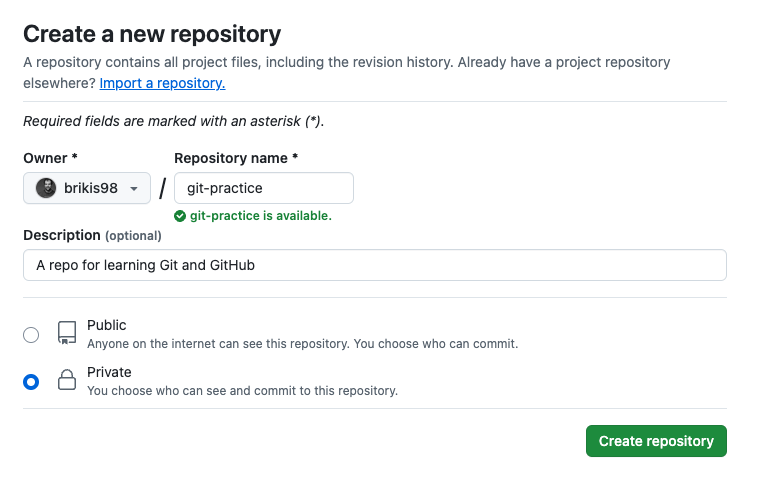
Next, create a new repository in GitHub, give it a name (e.g., git-practice), make the repo
private, and click “Create repository,” as shown in here:
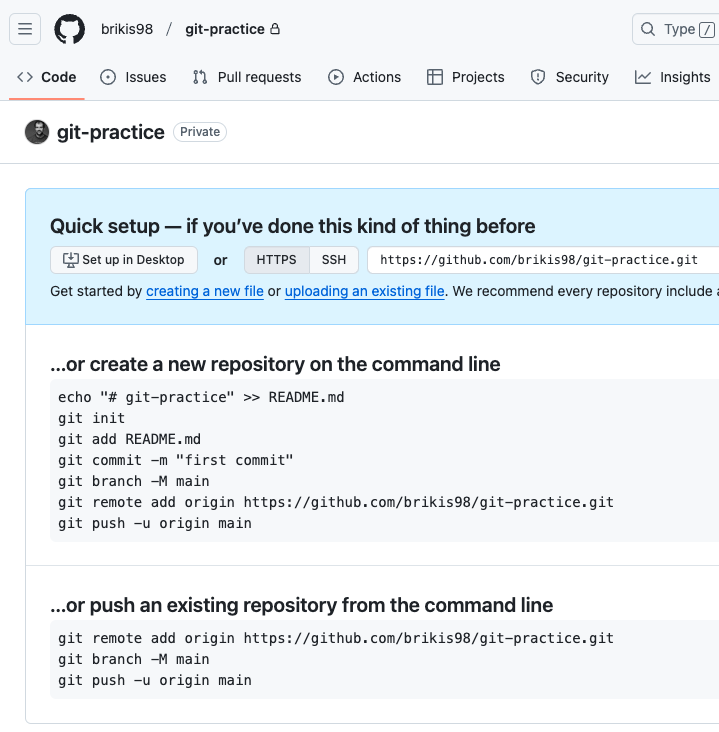
This will create a new, empty repo for you that looks something like this:
Copy and paste the git remote add command from that page to add a new remote, which is a Git repository hosted
remotely (i.e., somewhere on the Internet):
$ git remote add origin https://github.com/<USERNAME>/<REPO>.git
The preceding command adds your GitHub repo as a remote named origin. You can name remotes whatever you want, but
origin is the convention for your team’s central repo, so you’ll see that used all over the place.
Now you can use git push <REMOTE> <BRANCH> to push the code from branch <BRANCH> of your local repo to the remote
named <REMOTE>. So to push your main branch to the GitHub repo you just created, you’d run the following:
$ git push origin main
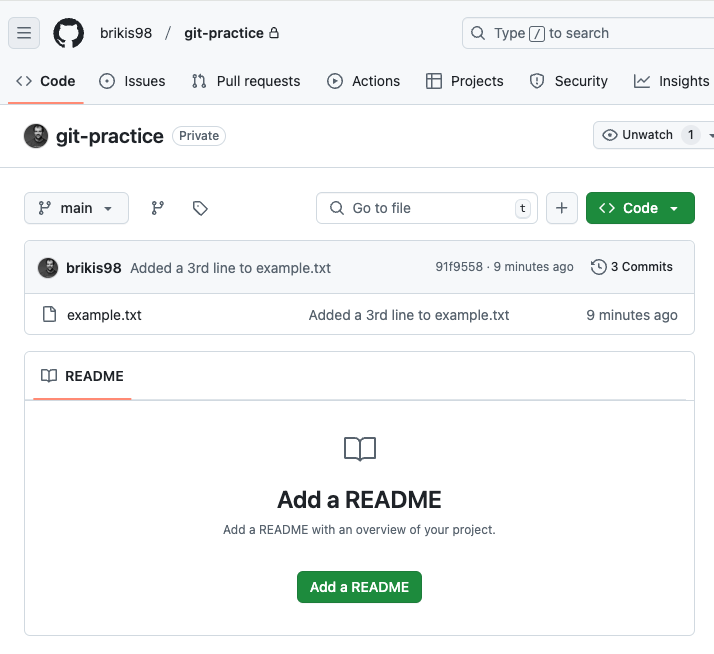
If you refresh your repo in GitHub, you should now see your code there, as shown in the following image:
Congrats, you just learned how to push your changes to a remote endpoint, which gets you halfway there with being able to collaborate with other developers. Now it’s time to learn the other half, which is how to pull changes from a remote endpoint.
Notice how GitHub prompts you to “Add a README” to your new repo. Adding documentation for your code is always a good idea, so let’s do it. Click the green Add a README button, and you’ll get a code editor in your browser where you can write the README in Markdown:

Fill in a reasonable description for the repo and then click the “Commit changes…”
button. GitHub will prompt you for a commit message, so fill one in just like the -m flag on the command-line, and
click the “Commit changes” button. GitHub will commit the changes and then take you back to your repo, where you’ll be
able to see your README:
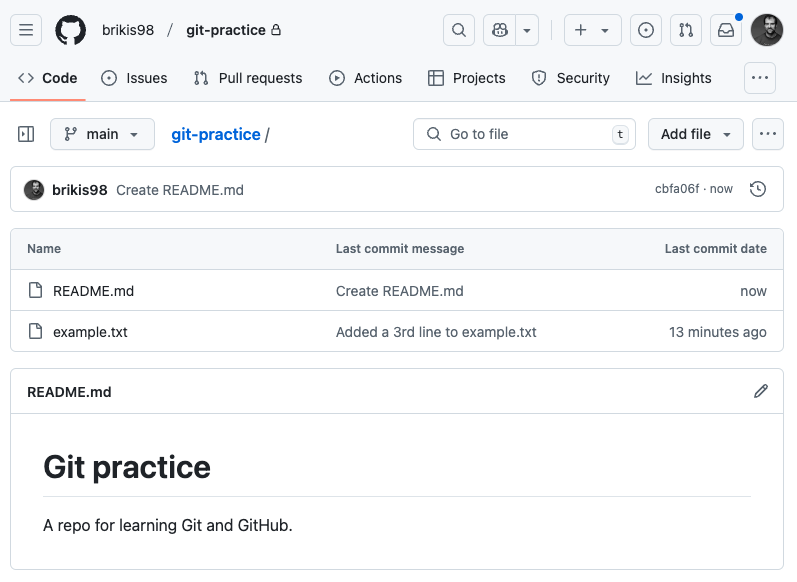
Notice that the repo in GitHub now has a README.md, but the copy on your own computer doesn’t. To get the latest code
onto your computer, run the git pull <REMOTE> <BRANCH> command, where <REMOTE> is the name of the remote to pull
from, and <BRANCH> is the branch to pull:
$ git pull origin main
Git will fetch the latest changes from origin, merge them into your local copy, and show you a summary of what
changed, which should include the new README.md file. Congrats, you now know how to pull changes from a remote
endpoint!
Note that if you didn’t have a copy of the repo locally on your computer at all, you couldn’t just run git pull.
Instead, you first need to use git clone to check out the initial copy of the repo. To try this out, move your
git-practice folder to the trash. This may seem a bit scary, but one of the benefits of version control is that it
backs up all your work, so don’t worry! Once the folder is in the trash, run git clone to get a fresh copy of it
locally again:
$ git clone https://github.com/<USERNAME>/<REPO>
When you run git clone, Git will check out a copy of the repo <REPO> to a folder called <REPO> in your current
working directory. It’ll also automatically add the repo’s URL as a remote named origin.
So now you’ve seen the basic Git workflows:
git clone: Check out a fresh copy of a repo.git push origin <BRANCH>: Push changes from your local repo back to the remote repo, so all your other team members can see your work.git pull origin <BRANCH>: Pull changes from the remote repo to your local repo, so you can see the work of all your other team members.
This is the basic workflow, but what you’ll find is that many teams use a slightly different workflow to push changes, as discussed in the next section.
Open a Pull Request in GitHub
A pull request (PR) (sometimes called a merge request in other platforms, such as GitLab) is a request to merge one
branch into another; in effect, you’re requesting that someone else runs git pull on your repo/branch. GitHub
popularized the PR workflow as the de facto way to make changes to open source repos, and these days, many companies
use PRs to make changes to private repos as well. The pull request process is as follows:
- You check out a copy of a repo (e.g.,
acme-repo), create a branch (e.g.,bug-fix), and commit your changes to this branch. Note that if you have write access toacme-repo, you can create thebug-fixbranch directly inacme-repo. However, if you don’t have write access, which is the case ifacme-repois in someone else’s account (e.g., it’s an open source repo maintained by someone else), then you first create a fork ofacme-repo, which is a copy of the repo in your own account, and then you create thebug-fixbranch in your fork. - When you’re done with your work in the
bug-fixbranch, you open a pull request againstacme-repo, requesting that the maintainer of that repo merges your changes from thebug-fixbranch into some branch inacme-repo(typicallymain). - The owner of
acme-repothen uses GitHub’s PR UI to review your changes, provide comments and feedback, and ultimately, decide to either merge the changes in, or close the PR unmerged.
Let’s give it a shot. Create a new branch called update-readme in your repo:
$ git switch -c update-readme
Make a change to the README.md file. For example, add a URL to the end of the file. Run git diff to see what your
changes look like:
$ git diff
diff --git a/README.md b/README.md
index fe36da2..4a1a513 100644
--- a/README.md
+++ b/README.md
@@ -1,3 +1,5 @@
 # Git practice

 A repo for learning Git and GitHub.
+
+https://www.fundamentals-of-devops.com/
If the changes look good, add and commit them:
$ git add README.md
$ git commit -m "Add URL to README"
Next, push your update-readme branch to the remote repo:
$ git push origin update-readme
You should see output that looks something like this:
remote:
remote: Create a pull request for 'update-readme' on GitHub by visiting:
remote:      https://github.com/<USERNAME>/<REPO>/pull/new/update-readme
remote:
GitHub conveniently shows you a URL for creating a pull request (you can also create PRs by going to
the Pull Requests tab of your repo in a web browser and clicking the New Pull Request button). Open that URL in your
web browser, and you should see a page where you can fill in a title and description for the PR. You can also scroll
down on that page to see the changes between your branch and main, which should be the same ones you saw when
running git diff. If those changes look OK, click the “Create pull request” button, and you’ll end up on the GitHub
PR UI:
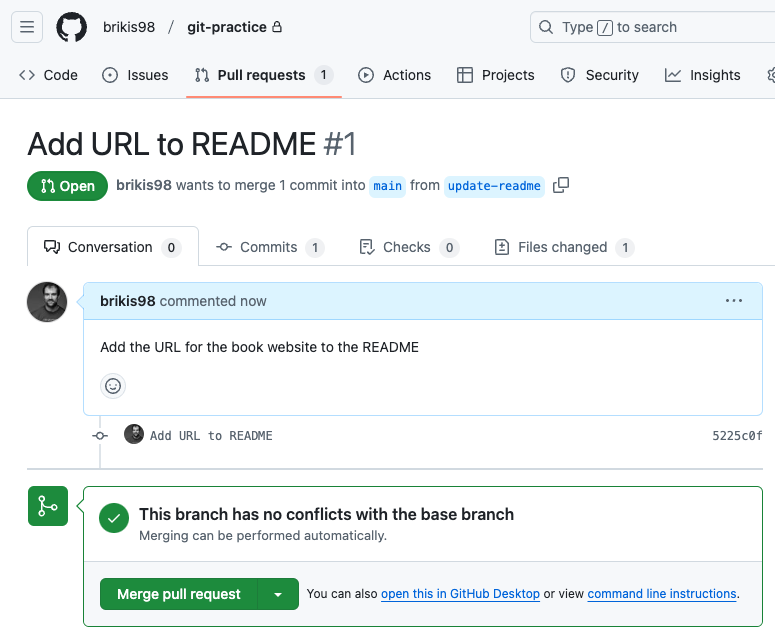
You and all your team members can use this PR page to see the code changes (try clicking the “Files changed” tab
to get a view similar to git diff), discuss the changes, request reviewers, request changes, and so on. All of this
discussion gets stored in GitHub, so if later on, you’re trying to debug an issue or figure out why some code is the way
it is, these PR pages serve as a great source of history and context. As you’ll see in Chapter 5 of
Fundamentals of DevOps and Software Delivery, this is also the place where a lot of the CI / CD
integration will happen. If the PR looks good, click “Merge pull request,” and then “Confirm merge,” to merge the
changes in.
Conclusion
Congrats! You’ve now learned the basics of how to use Git and GitHub. This is just enough to get you started and minimally productive. To go further, here are a few exercises you can try at home to get your hands dirty:
- Learn how to use
.gitignorefiles to tell Git which files not to commit (also, check out gitignore.io for a handy tool for generating.gitignorefiles). - Learn how to use the
git tagcommand to create tags. - Learn to use
git rebase. Note that there is a lot of nuance to when to usegit rebaseversusgit rebase -iversusgit merge. See merging versus rebasing for a nice guide.
To learn how to integrate version control into your software delivery process, check out Fundamentals of DevOps and Software Delivery!